DIY Worm babies
 I was going to go out and buy a worm farm when I realised I could make one myself and save $70. So today I found whatever I had around the place and created this, my worm farm.
Alfalfa House kindly donated a generous handful of worms from one of their own 6 worm farms to start me off.
Digital Seed was a helpful resource for working out how to create my DIY worm farm, and I'm sure it could have been better if I'd followed their directions and bought a couple of cheap $6 containers but I figured this set-up would do, at least for now, until my worms have multiplied quite a bit and need more room.
This is how worm farming works: You feed the worms weekly, by burying kitchen scraps (about 2-4 x as much as there are worms) in their bedding. Digital Seed said to bury it in a different spot in their bedding each week over six weeks, and that the worms follow the scraps, so when you get to the sixth week, if they've consumed all the scraps and bedding, you swap them into the container above and collect the remaining castings for the garden.
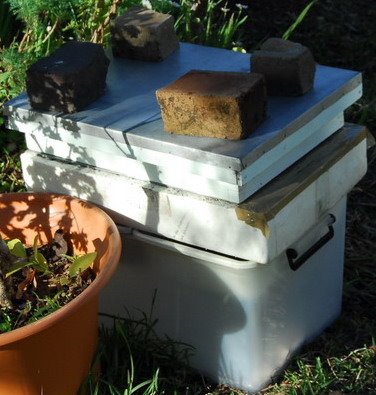
My McDodgy worm farm components: Mine's comprised of a series of stuff - the lid from my old beehive as a cover, a "spacer" from my beehive as a worm box (Box #1), a few "queen excluders" as ventilators/floors to the boxes, a polystyrene box previously cut down and used for growing wheatgrass to use as another worm box (Box #2), 2 old kitty litter trays to catch worm juice, and a stand consisting of that large broken container at the bottom (would have let it catch the juice had it not been broken and leaky).
Distracting side note: The excluders are like a strong steel mesh, and in beekeeping they're used to prevent the queen bee from leaving the "brood chamber" and getting lost in the hive (worker bees can fit through the many holes, and she can't as she is larger), meaning there is less chance you will kill her accidently when you open up your hives to check them out or remove or replace frames of honey. If you kill the queen, the bees get very upset as she is the essence of the hive - laying all the baby bees - without her unless they have some babies already that they can convert into a queen with a special diet, or unless they've already got some queens being raised (due to booming population/crowded conditions and the need to divide up) they're doomed.
Constructing the farm:
My basic construct from top to bottom is: Cover, (spare and empty) Box #1, Excluder#1, Shade Cloth cover, Worm bedding + buried scraps inside Box #2, Excluder #2 as a floor, 2 litter trays as worm juice catchers, held up and raised from the ground by the broken container
Worms need bedding. The bedding I've used for the worms is sawdust-soil, a handful of mature compost and damp shredded newspaper. Once you've added the bedding you can sprinkle on the worms, and in response to light they will burrow down into the bedding.
The worms in my farm are only in the polystyrene section (Box #2). The bedding containing the worms and buried scraps is covered by a cut out piece of shade cloth pressed against the bedding and held down by the excluder above it to prevent fruit fly and vermin entering and having access to the scraps.
In the worm farm I'm now using the excluders to provide ventilation, as well as to allow the worms to move into their new bedding when the time comes to swap them out into the other box (the one made of the "spacer", which I'm now going to call Box #1) and collect the nutrient rich worm castings for use on the garden. You swap them out by placing fresh bedding into Box #1 above the other box and by removing the shade cloth cover overnight from Box #2 so the worms can move upwards.
Underneath the polystyrene box (Box #2) I have 2 litter trays resting on top of the broken container "stand" to catch the worm juice that will ooze out as the worms eat through the kitchen scraps. The worm juice can be diluted 1:20 to spray onto plant leaves - with the advantage that it won't burn plants unlike most foliar sprays. You can also use it direct without worry, but this is more a waste than anything else. You only need to use weekly at 1:20 to obtain amazing results. You can also water your plants with it.
In addition, once the worms have eaten through all their bedding and scraps, mainly worm castings (poo!) is left behind in Box #2 (which after you've moved the worms into Box #1) can be added to soil to plant seedlings, to pot plants or even in garden beds to enrich soil. Some sources say you can grow seedlings directly in it, others believe it to be too strong. I haven't experimented with this yet but when I have you can be sure I'll post on it.
The cool thing is worms add more NPK to the stuff they eat in the process of digestion some how - about 11 times as much as would have been produced through composting the scraps.
Alfalfa House were also kind enough to give me some of their worm juice at the same time I got my worms, so I diluted it 1:20 and sprayed the back lemon tree a few days ago. It's yellowing leaves are now turning lovely and green which is incredible because everything else I've tried has not helped that tree.
It's great to use it as a foliar spray as it also acts as a biological control for pests - because the worm juice is full of bacteria and microorganisms assist in the control of pests.
posted by aneurine at 9/08/2006 05:13:00 pm
![]()

<< Home